
Quick Start Guide
At its core, WebPageTest is used for measuring and analyzing the performance of web pages. There are a lot of options that may seem intimidating at first but doing quick testing is pretty simple. This guide will walk you through submitting a test and interpreting the results.
Running a Performance Test
1. Enter The Page URL:
The first thing you need to do is decide on a page to test. Most people start with the main page for their site (but don't neglect the other pages people visit either). Once you have decided on a page you'd like to test you go to WebPageTest and give it the URL for the page you want tested:
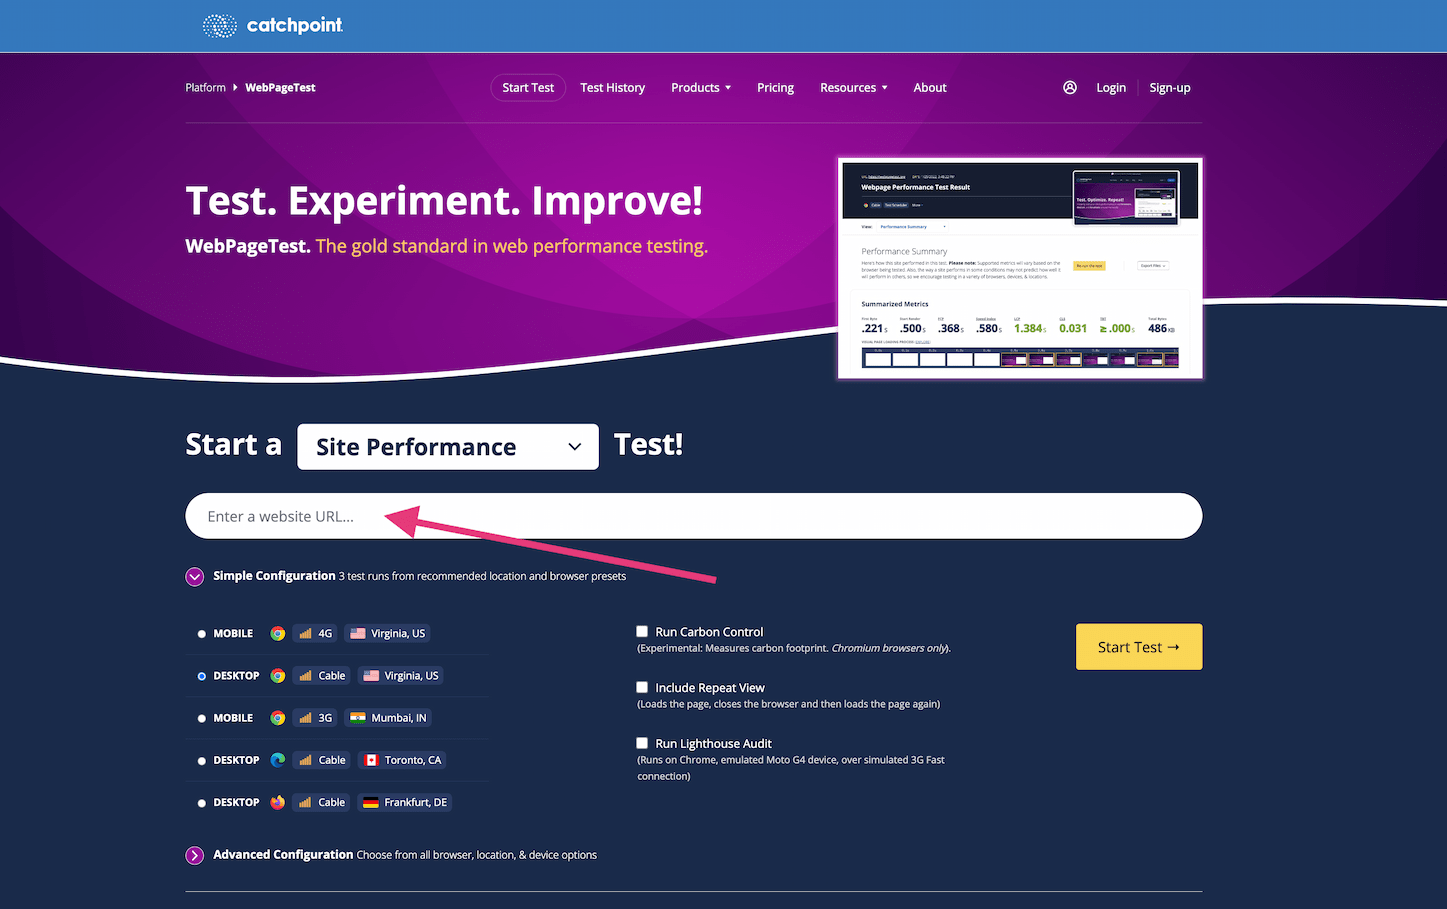
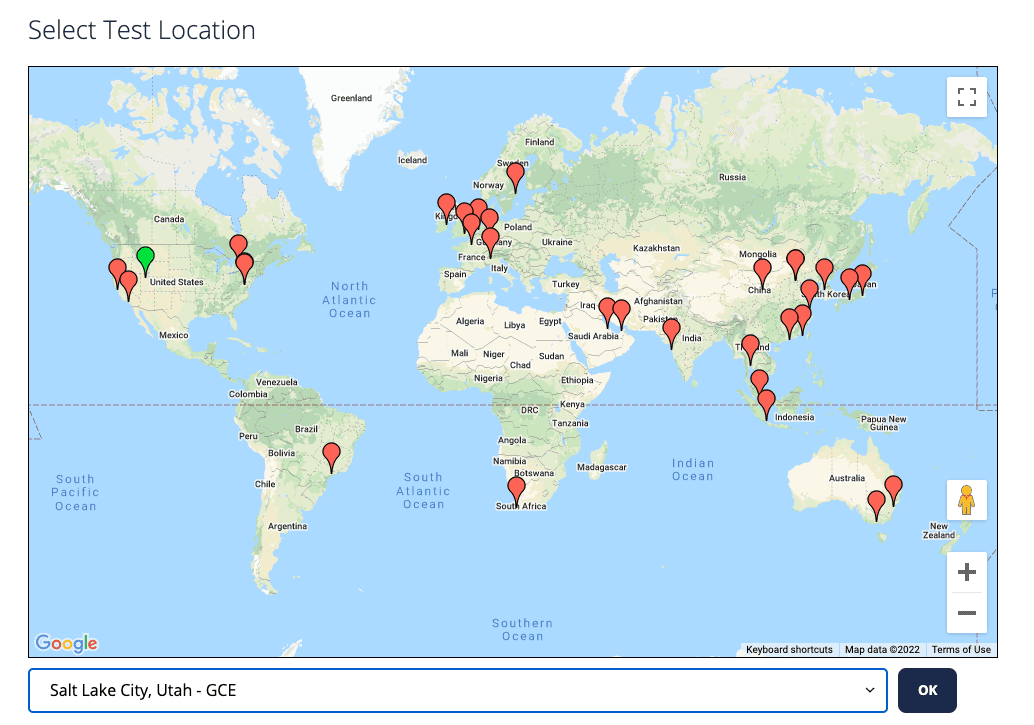
2. Select a Location:
Next you should decide where you want the test to be run from. WebPageTest has test machines that are physically located around the world and you should test from a location that is close to where your users are visiting from. You can either pick a location from the list or if you click on the Change button you can pick a location from a map view (just click on a balloon to select a location and then click ok). If you hold the pointer over the bubbles they will display a message telling you where the location is:
3. Select a Browser:
Finally, you need to decide what browser to use for the test. Different locations support different browsers so if a given location doesn't have the browser you are looking for, you can try a different location. The Dulles, VA USA location supports all of the browsers that WebPageTest works with (Chrome, Firefox, Edge, Internet Explorer, Android, iOS). We usually recommend using Chrome for initial testing because it has the most information reported. WebPageTest offers emulated devices as well which simulate various mobile devices' constraints (such as CPU throttling) via Chrome Devtools' Device Mode.

4. Submit the Test
After everything is configured the way you like, click on the "Start Test" button and your request will be sent to the test location for testing. The test may take a while to run depending on how many tests are ahead of yours (figure at least one minute for each test ahead of yours but it's not unusual for it to be even longer than that). Once the test is complete you will be presented with the results.
Interpreting the Results
The results of a standard WebPageTest run begin on the summary page. This page starts with a written summary of how the site performed based on three categories: "Is it quick?", "Is it usable?", and "is it resilient?", which you can click to reach the Opportunities & Experiments page. Beneath the summaries, you'll find the metrics recorded by WebPageTest which include brief summaries beneath them to explain their purpose. These metrics will show for the median run and repeat run if repeat runs were selected up-front, and a preview of the visual page loading filmstrip shows below the metrics. After the WebPageTest metrics, you'll sometimes find additional metrics gethered by Google's CrUX report, which are collected anonomously for many sites from users in Chrome. And beyond that, you'll find some previews of each run's waterfall, with link to detail pages.
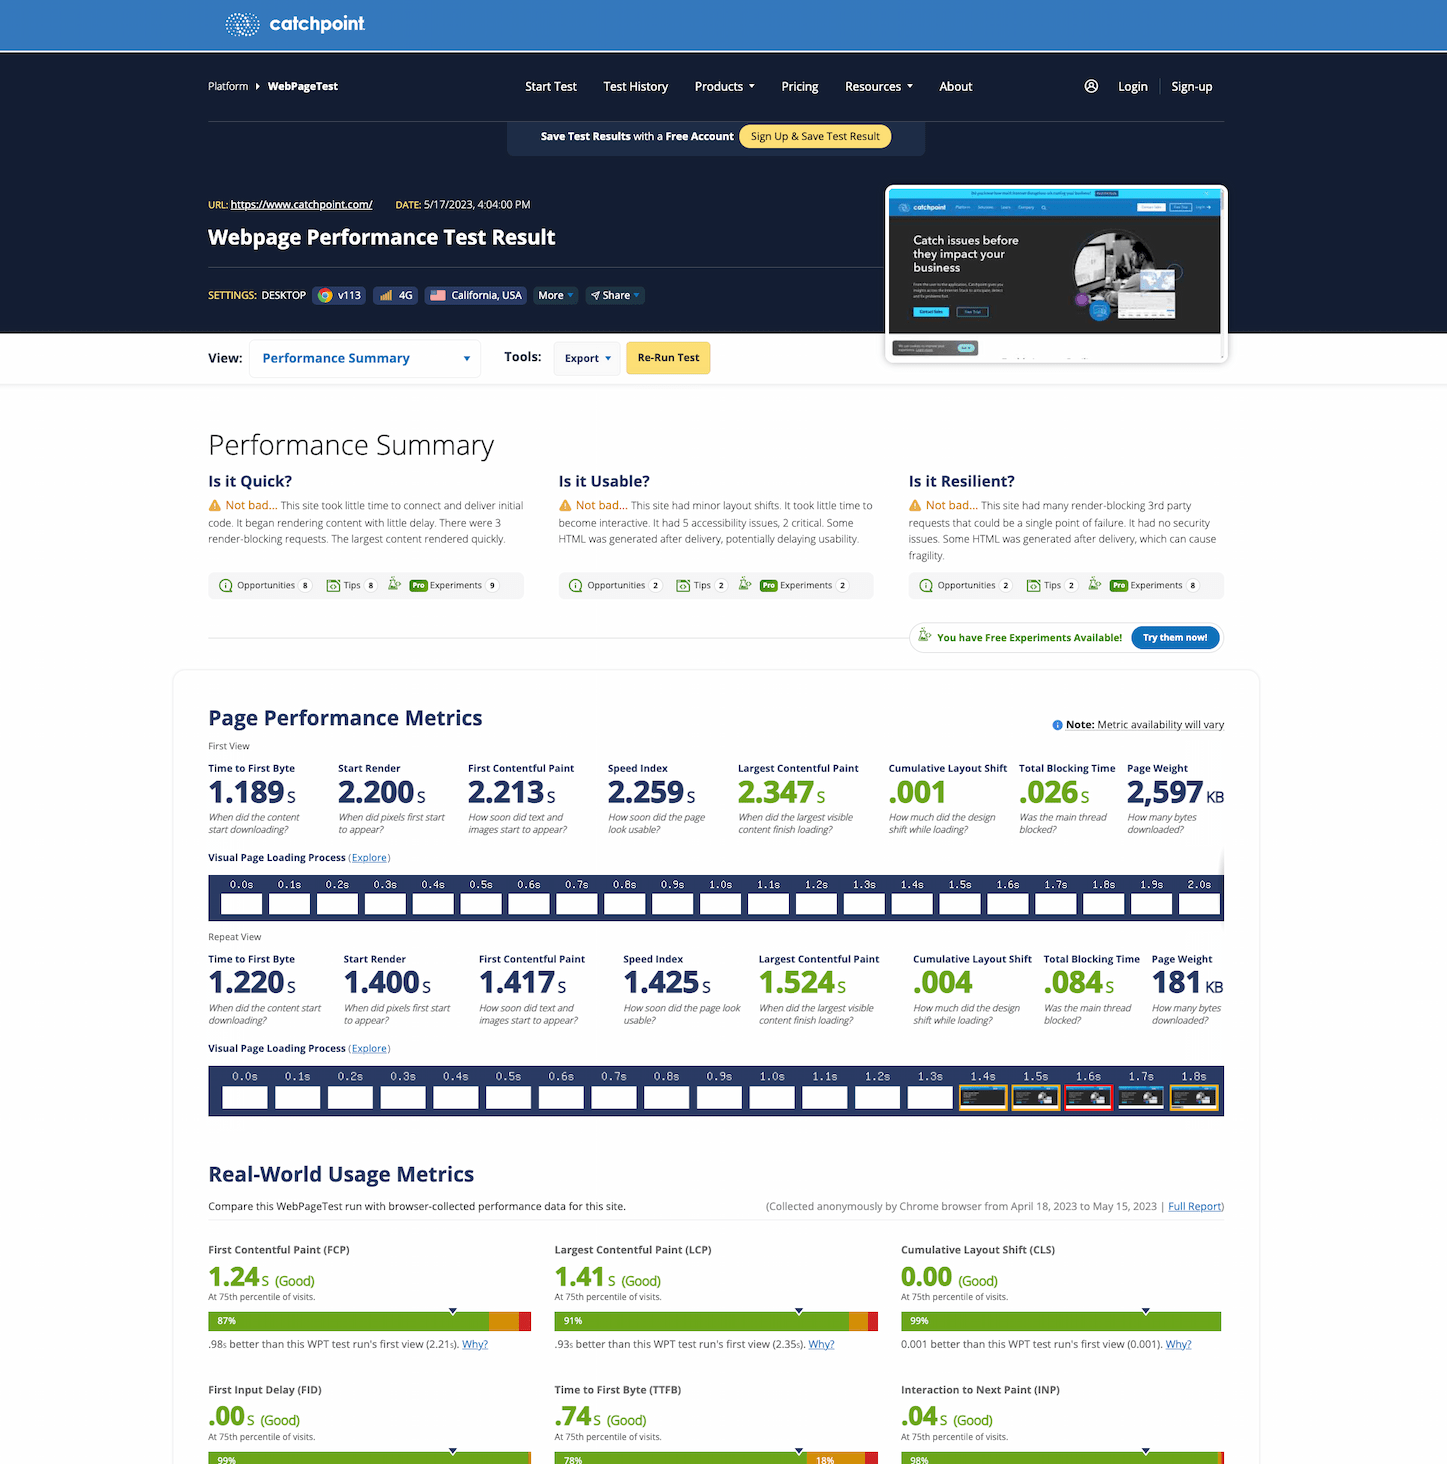
High-level Metrics
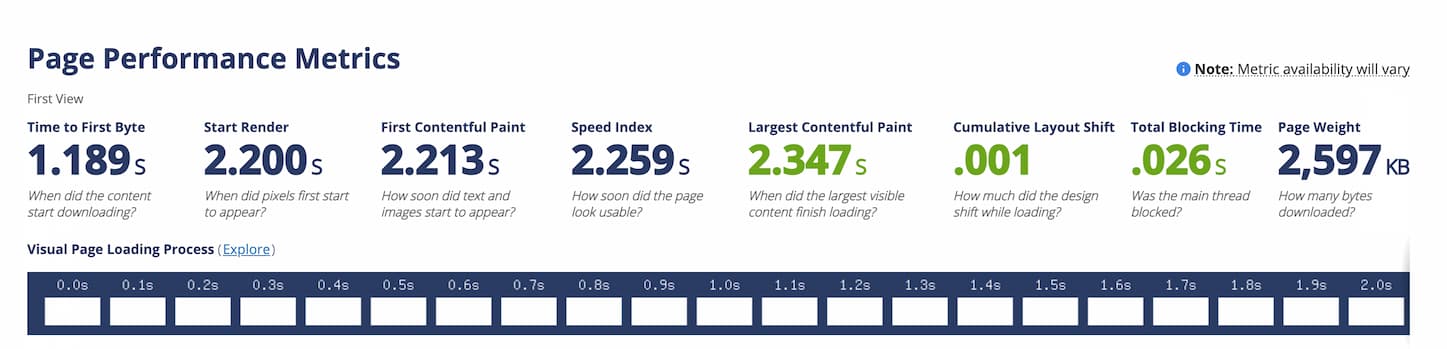
Time to First Byte
The First Byte time is the time from when the user started navigating to the page until the first bit of the server response arrived. The bulk of this time is usually referred to the "back-end time" and is the amount of time the server spent building the page for the user.
Start Render:
The Start Render time is the first point in time that something was displayed to the screen. Before this point in time the user was staring at a blank page. This does not necessarily mean the user saw the page content, it could just be something as simple as a background color but it is the first indication of something happening for the user.
First Contentful Paint
How soon did text and images start to appear?
Speed Index
The Speed Index is the average time at which visible parts of the page are displayed. It is expressed in milliseconds and dependent on size of the view port.
Largest Contentful Paint
When did the largest piece of content in the viewport finish loading?
Cumulative Layout Shift
How much did the layout within the viewport shift while the page was loading?
Total Blocking Time
Total amount of time where the main thread was blocked by long tasts after the initial content was rendered
Page Weight
This is the amount of data that the browser had to download in order to load the page. It is also commonly referred to as the "Page Size".
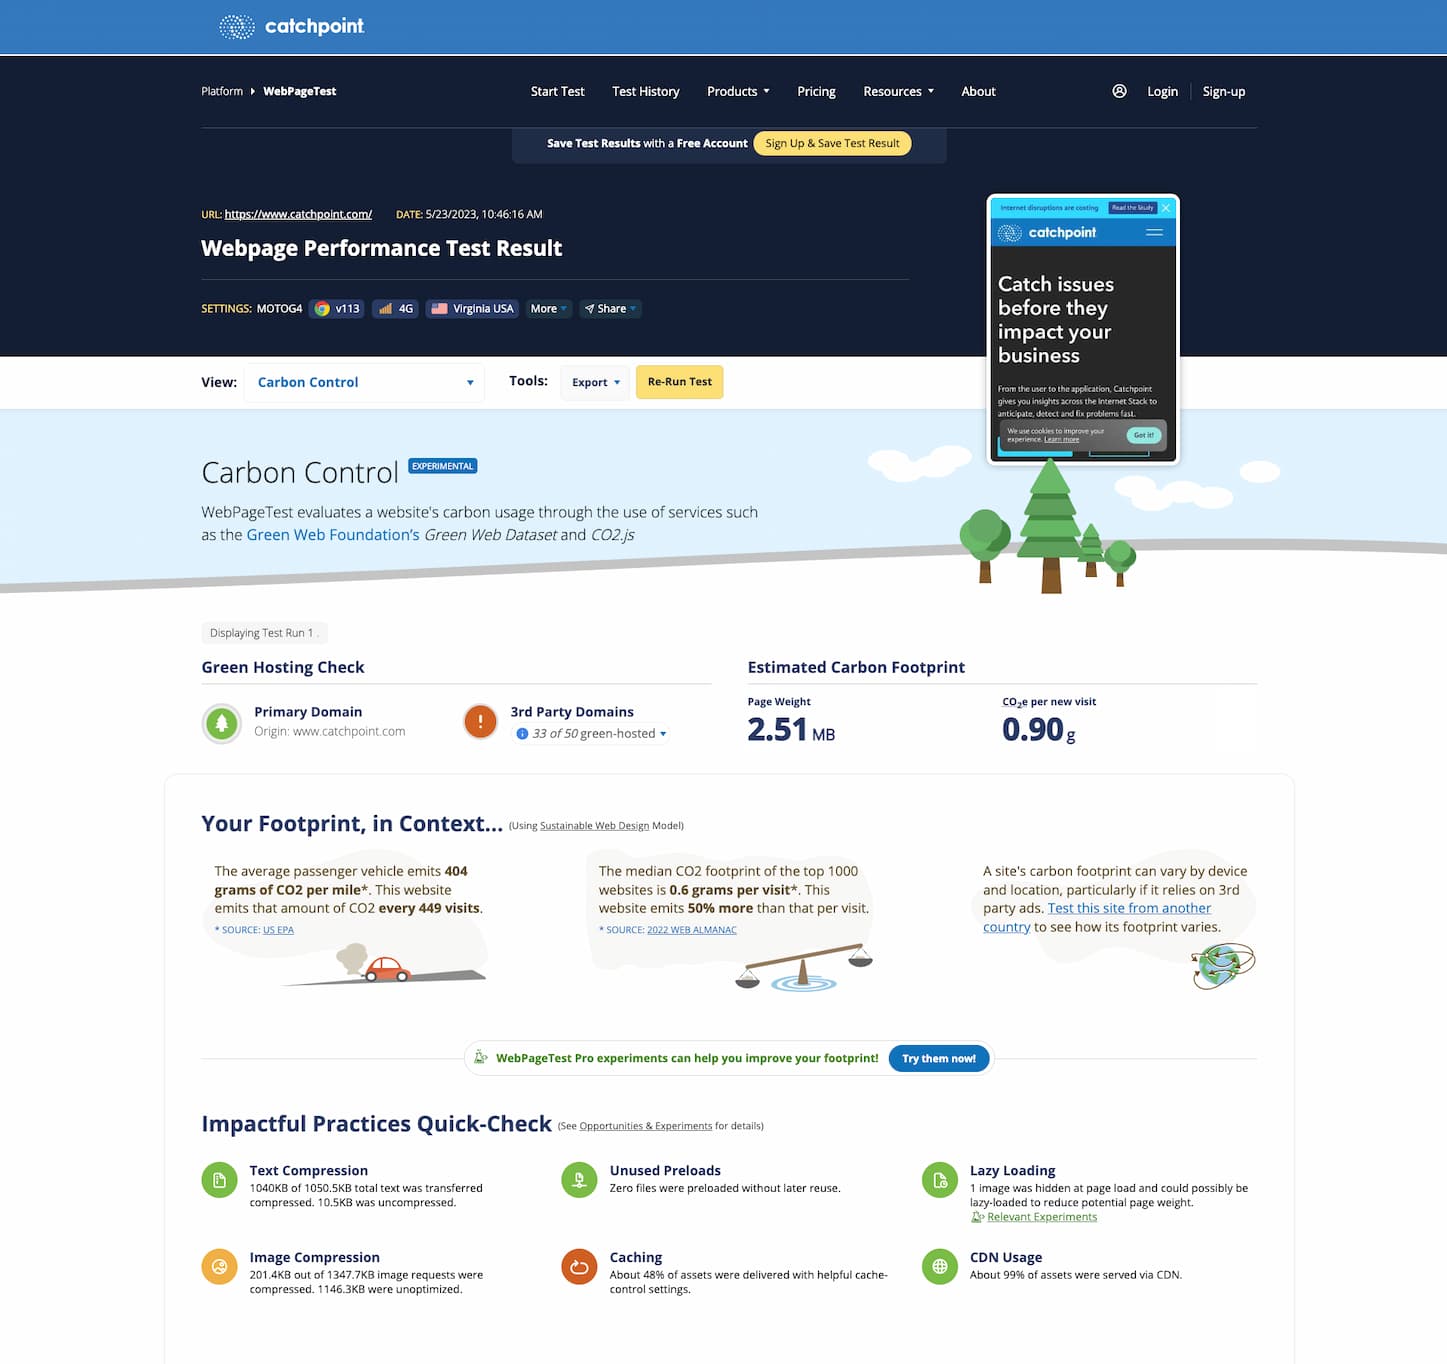
Carbon Footprint (Experimental)
This is the estimated carbon equivalent of a webpage, calculated based upon green hosting statuses and page weight.
Result Detail Pages
The results navigation offers links to deeper analysis of the test results.

Opportunities & Experiments
The opportunities and experiments page offers a breakdown of diagnostics that check for performance bottlenecks and when possible, offer no-code experiments that you can run to test whether various optimizations improve performance.

Some Experiments are free to try but most of them are a premium feature that comes with WebPageTest Pro. After running an experiment, you'll see a comparison of the experiment run and a control run (which is the original site re-run through the experiments proxy server to create a comparable environment). This page can help determine if key metrics were improved.
You can read more about Opportunities & Experiments on the WebPageTest blog.
Carbon Control
Carbon Control is a new Experimental feature that estimates a site's carbon footprint and allows you to run experiments to potentially improve that footprint. You can read more about Carbon Control on the WebPageTest blog.
Details Page
The details result page provides additional metrics for each run and repeat run of a test as well as a waterfall for requests and connections that a site makes.
Filmstrip View
The filmstrip page provides a visual keyframe view of the page as it loaded. It also serves as a run comparison tool for multiple test run filmstrips. beneath the filmstrips, you can find waterfalls with a red overlay line that syncs its timing to the left edge of the filmstrips above. This allows you to explore what was happening in the browser at various visual moments in the filmstrip.
Optimization Page:
At the top of the optimization page are a set of grades for the most critical performance optimizations. These cover the basic optimizations that apply to just about all sites and anything that isn't an A or a B justifies some serious scrutiny and investigation.
Keep-alive Enabled:
Each request for a piece of content on the page (image, javascript, css, flash, etc) needs to be made over a connection to the web server. Setting up new connections can take a lot of time so it is best to re-use connections when you can and keep-alive is the way that is done. They are enabled by default on most configurations and are part of the HTTP 1.1 standard but there are times when they will be broken (sometimes unintentionally). Enabling keep-alives is usually just a configuration change on the server and does not require any changes to the page itself and can usually reduce the time to load a page by 40-50%.
Compress Text:
Just about everything on a page that isn't an image or video is text of some kind (html, javascript, css). Text compresses really well and HTTP provides a way to transfer the files in compressed form. Enabling compression for text resources is usually just a server configuration change without requiring any changes to the page itself and can both improve the performance and reduce the costs of serving the content (by reducing the amount of data transmitted). Since text resources are usually downloaded at the beginning of the page (javascript and css), delivering them faster has a much larger impact on the user experience than excessive bytes on images or other content.
Compress Images:
The image compression check just looks at photo images (JPEG files) and makes sure the quality isn't set too high. JPEG images can usually be compressed pretty substantially without any noticeable reduction in visual quality. We use a standard of compressing the images at a quality level of "50" in Photoshop's "Save for Web" mode but generally you should compress them as much as you can before they start to look bad. It's also not uncommon for other data to be included in photos, particularly if they came from a digital camera (information about the camera, lens, location, even thumbnail images) and some of that should be removed from images before being published to a web page (be careful to retain any copyright information).
Cache Static Content:
Static Content are the pieces of content on your page that don't change frequently (images, javascript, css). You can configure them so that the user's browser will store them in a cache so if the user comes back to the page (or visits another page that uses the same file) they can just use the copy they already have instead of requesting the file from the web server. Successfully caching static content in the user's browser can significantly improve the performance of a repeat view visit (up to 80+% depending on the page) and reduces the load on the web servers. It can sometimes be tricky to implement caching without breaking a page though so don't just enable it blindly (you need to be able to change the file name for any files that you expect to change).
Use of CDN:
Each request for a piece of content to the web server has to travel from the user's browser all the way to the server and back. As you get further and further from the server this can become a significant amount of time (which adds up quickly as there are more requests on the page). Ultimately the time it takes is limited by the speed of light so there's not much you can do except to move your server closer to the users. That is exactly what a Content Distribution Network (CDN) does. They have servers all over the world that are close to users and they can serve a web site's static content from servers close to users. The only case where it doesn't make sense to use a CDN is if all of the users for a web site are close to the web server already (like for a community web site).